I posted on this subject before, but back then Google didn't officially support iOS with their Cardboard SDK. That has changed, so things are a little easier now. Yesterday I decided to try it out and figured I'd share what I learned.
What I'm going to cover:
- I'll point to a simple tutorial to build a quick 3D game. We'll be extending this a little too.
- From there we'll convert that game to support VR mode using Cardboard.
- We'll add the VR camera.
- We'll add some interaction to the scene using gaze and clicks.
- We'll add some UI, including HUD and 3D buttons.
- We'll add support to switch between regular and VR modes.
- Finally, we'll build through XCode to get it running on an iPhone.
- You could do these steps earlier to try things out on your phone at each stage, but I just used the built-in Unity player in the IDE most of the time since it takes a while to build.
Prerequisites/My setup:
- I'm using the latest of everything at time of writing
- A Macbook Pro, (El Capitan,) and an iPhone 6S, (9.2.1)
- Unity 5.3.2 (Download and install this, making sure to install the iOS features.)
- Cardboard SDK v0.6 (Download this. We'll add it to our project shortly.)
- XCode 7.2.1
Getting setup and adding a VR camera
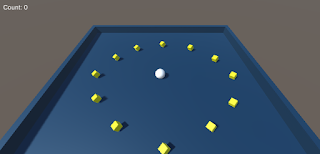
Unity offer a tutorial on their website for absolute beginners to learn about Unity fundamentals while making a very basic 3D game, Roll-a-ball. We'll be building from this, so I highly recommend following each stage of that tutorial if you are a beginner to become familiar with the terminology, interface, game structure, etc. But if you don't want to do that, I've uploaded the base project to GitHub, along with the final result from the tutorial below. |
| Roll-a-Ball |
Import the Cardboard SDK: Go to Assets > Import Package > Custom Package. Select the CardboardSDKForUnity unitypackage where you downloaded it and click Open. Since we are using Unity 5 we can uncheck any items marked Legacy. Notice the Cardboard and Plugins folders are added to your project.
Delete the Main Camera item in your project hierarchy, (note that this means our CameraController script that we wrote as part of the Unity tutorial is no longer used.) Replace your camera by dragging Cardboard > Prefabs > CardboardMain from your project view to the scene hierarchy. Set the position of CardboardMain to (x,y,z)=(0,10,-10) and rotation x=45 to get it to the same spot as our old camera. In your hierarchy select CardboardMain > Head > Main Camera, then set Clear Flags = Skybox in the inspector.
Press Play, and you should see the game view showing a stereo rendering of the Roll-a-Ball board. While in play mode, press Alt and move the mouse around to pan horizontally and vertically to simulate moving your head around. Use Ctrl to simulate tilting your head from side to side. Your keyboard arrow keys or gamepad directional buttons will still work to move the ball around too.
 |
| Roll-a-Ball in VR! |
Adding Interaction
We're going to add the ability to interact with the game world by just looking at it. In the hierarchy select the Event System and add a Script component Cardboard > GazeInputModule. Make sure to move this component above any other input components in the inspector, (you can use the cog button next to the component's name.) In our case, we need to move Gaze Input Module up once, above Standalone Input Module. Also in the inspector, check VR Mode Only.Next select CardboardMain > Head > Main Camera in the hierarchy and add a component Event > PhysicsRayCaster, (note, make sure not to pick a Physics 2D Ray Caster.) This will project rays from the camera into the world so we can detect collisions with the object you are looking at and react.
Now we want something to happen in response to our gaze. We'll do something simple to start with to prove things are working, switching the colour of the ground. In the hierarchy select Ground and add an Event > Event Trigger component. Within that component click the button to Add New Event Type, OnPointerEnter, and set MeshRender.material to Pick Up. Do the same for OnPointerExit to have the material change back to Background.
 |
| Setting up the Event Trigger |
Click play and try looking around. If you have part of the ground in the middle of your view you should notice it change colour. Look away and it should change back. You may notice some flicker. Lets see if we can find out why.
To make it easier to see what we are pointing at we are going to add a reticule to our view. In the project we'll drag Cardboard > Prefabs > UI > CardboardReticule to under CardboardMain > Head > Main Camera in the hierarchy. If you click play again you should notice a white point in the middle of the screen which changes size as it approaches objects. You should also now see that the ground doesn't change colour when we are pointing at some object in the way, (e.g. the player ball or pick ups.)
 |
| Look at the ground to change the colour |
Now let's remove that Event Trigger component so we can add something more useful in a moment.
UI in VR
Where did our UI go from the original tutorial? You may notice it is still displayed at the top left of the screen in the Game view, but we wouldn't see that when wearing our Cardboard device. So we need to make it part of the 3D world. Unity have a doc explaining more about this. Select Canvas in the hierarchy and see the Canvas component in the inspector. Set the Render Mode to World Space and set Event Camera to Main Camera. Now in the Scene view if you just zoom out you should see a large rectangle, which is our UI canvas. We need to move it to a more reasonable/useful position. In the inspector set the position to (x,y,z)=(0,2,0), size to (128,128), rotation to x=90, scale to (x,y,z)=(0.1,0.1,1). Select Canvas > Count Text in the hierarchy and change the Anchor Preset from top-left to top-center, (hold Shift and Ctrl when clicking.) Change the Paragraph Alignment to Center. Note I've removed the Win Text from the tutorial and just use the Count Text to show the win message, which you can see in a script a little later in this post.Click play and you should see the player's score hovering above the game board.
 |
| That text is diegetic UI, (in-world UI,) there at the top |
We're going to add a button and some script in order to reset the game board which pops up once the player has collected all of the pick-ups. So select the Canvas and from the main menu click GameObject > UI > Button. Position it somewhere appropriate within the canvas, (I went for a bottom-center anchor preset.) Name this button Play Again Button and set a Highlighted colour. Now click to disable it, (top-left checkbox of the inspector.)
On the Canvas object we'll add a New Script component in C#. Call it GameplayMenu. Very simply, we just need one function here:
// Reset the game and start againSave the file and go back to Unity. Select the Play Again Button, set the OnClick event to use the Canvas object and choose the GameplayMenu.PlayAgain() action. If you have an issue finding that method, try clicking elsewhere in the editor and in the main menu click Assets > Open C# Project and try again.
public void PlayAgain () {
UnityEngine.SceneManagement.SceneManager.LoadScene ("MiniGame");
}
Finally we'll update the PlayerController win code to show the button:
// Reference to a UI element so the player can reset the gameBe sure to go back to the inspector for the Player object and set the Play Again Button setting to point to the Play Again Button object.
public Button playAgainButton;
void SetCountText() {
if (count == 0) {
countText.text = "Tap ground to move";
} else if (count == 12) {
countText.text = "You Win!";
playAgainButton.gameObject.SetActive (true); // Add this line
} else {
countText.text = "Count: " + count.ToString ();
}
}
Try playing the app again, collect the pick-ups and see the Play Again Button appear. Try looking at it to see the colour change, then tap it to reset the level.
Note, when I did this I noticed the world would go dark when testing within the Unity editor. To work around this you can click Window > Lighting on the main menu, then in the Lighting dialog box uncheck Other Settings > Auto, then click Build.
Bonus Interaction
We're going to make it so that you can control the game using only the Cardboard device. You'll be able to gaze at a point on the ground, click the button on your Cardboard device and the ball will move towards it. In the PlayerController script:// Position that could be passed in from Gaze, Touch, Mouse to move the player towardsSelect the Ground object and add a New Script component called GroundTriggers. Add this code, which will forward the intersect point of the viewer's ray with the ground plane each time the player clicks their Cardboard device's button.:
private Vector3 moveTowardsPosition;
// Only move after a player clicks/taps, not each frame
private bool shouldMove;
// Called on first frame this script is active, (i.e. first frame of game)
void Start() {
rb = GetComponent();
count = 0;
SetCountText ();
shouldMove = false;
}
// Happens just before Physics calculations
void FixedUpdate() {
// If we got input from clicks, taps or cardboard, move towards it. Otherwise, see if there is keyboard/gamepad input.
if (shouldMove) {
// Get a vector from the player position to the point passed in
Vector3 movement = moveTowardsPosition - gameObject.transform.position;
// Multiply the input vector by the object's speed, then apply that result as a force to the object to move it
rb.AddForce (movement * speed);
// Don't do this every frame, only when we've been sent a new position, (e.g. OnClick)
shouldMove = false;
} else {
// Get device independent input, e.g. keyboard keys
float moveHorizontal = Input.GetAxis ("Horizontal");
float moveVertical = Input.GetAxis ("Vertical");
// Make a vector based on that input
Vector3 movement = new Vector3 (moveHorizontal, 0, moveVertical);
// Multiply the input vector by the object's speed, then apply that result as a force to the object to move it
rb.AddForce (movement * speed);
}
}
public void SetMoveTowardsPoint(Vector3 worldPosition) {
moveTowardsPosition = worldPosition;
shouldMove = true;
}
public class GroundTriggers : MonoBehaviour, IPointerClickHandler {Be sure to set the Player object in the Ground inspector, then try playing again. Look around, point and the ground and press your Cardboard button. To simulate the button press in the Unity editor you can use a mouse click. Note you may want to turn off Raycast Target as an option on the Count Text object so that your rays still reach the ground behind that floating text.
public PlayerController player;
// Will work for clicks and Cardboard trigger presses
public void OnPointerClick(PointerEventData eventData)
{
player.SetMoveTowardsPoint (eventData.pointerCurrentRaycast.worldPosition);
}
}
Awesome, we have a complete VR game for Google Cardboard!
Toggle VR mode on/off
But not everyone has a Cardboard device, so what if they still want to play our great game without us having to release a separate version from the original tutorial? Well why not have an option to toggle VR on and off?Add another GameObject > UI > Canvas to the root of our hierarchy. Name it Canvas - Settings so we can differentiate from our other Canvas object more easily, (perhaps name that Canvas - Gameboard.) Set position (x,y,z)=(0,0,16), size (128,128), rotation (x,y,z)=(0,0,0) and scale (x,y,z)=(0.1,0.1,1). Add a New Script component called CardboardModeManager and add this code:
using UnityEngine;Make sure you set the CardboardMain value in the new Canvas object's inspector.
using System.Collections;
using UnityEngine.EventSystems;
using System.Collections.Generic;
using UnityEngine.UI;
public class CardboardModeManager : MonoBehaviour {
// We need a reference to camera which
// is how we get to the cardboard components.
public GameObject cardboardMain;
// This is to enable/disable the reticule
private CardboardReticle cardboardReticle;
public void Start()
{
// Save a flag in the local player preferences to initialize VR mode
// This way when the app is restarted, it is in the mode that was last used.
int doVR = PlayerPrefs.GetInt("VREnabled");
Cardboard.SDK.VRModeEnabled = doVR == 1;
CardboardHead head = cardboardMain.GetComponentInChildren();
head.enabled = Cardboard.SDK.VRModeEnabled;
cardboardReticle = cardboardMain.GetComponentInChildren();
cardboardReticle.gameObject.SetActive(Cardboard.SDK.VRModeEnabled);
Cardboard.SDK.TapIsTrigger = true;
}
// The event handler to call to toggle Cardboard mode.
public void ChangeCardboardMode()
{
CardboardHead head = cardboardMain.GetComponentInChildren();
if (Cardboard.SDK.VRModeEnabled) {
// disabling. rotate back to the original rotation.
head.transform.localRotation = Quaternion.identity;
}
Cardboard.SDK.VRModeEnabled = !Cardboard.SDK.VRModeEnabled;
head.enabled = Cardboard.SDK.VRModeEnabled;
cardboardReticle.gameObject.SetActive(Cardboard.SDK.VRModeEnabled);
PlayerPrefs.SetInt("VREnabled", Cardboard.SDK.VRModeEnabled?1:0);
PlayerPrefs.Save();
}
// The Cardboard SDK can show a back button, (escaspe key
// on keyboard,) which we will use to get out of VR view
void Update () {
if (Cardboard.SDK.BackButtonPressed) {
ChangeCardboardMode();
}
}
}
Finally, under the Canvas - Settings object add a Button named Toggle VR. Set a highlight colour, set the label text and set the OnClick event to point to the Canvas - Setting object and use CardboardModeManager.ChangeCardboardMode() as the event.
That's it! Try playing again and switching VR mode on/off.
 |
| Our Diegetic UI Button |
Building for iOS and playing on your iPhone
From Unity we need to create an XCode project:- Open up the Build Settings by going to File > Build Settings.
- Select iOS under Platform. After selecting iOS, click the Switch Platform button.
- Click Player Settings to open the PlayerSettings panel in the Inspector.
- In PlayerSettings, at the bottom under Settings for iOS, click Resolution and Presentation to expand that panel, and set the Default Orientation to Landscape Left.
- Click Other Settings to expand that panel and find the Bundle Identifier field. Enter a valid package name for your application (such as com.mycompany.cardboarddemo)
- Click Build. This prompts you for a save name, and prepares an XCode project in the [your Unity project]/[your save name] directory.
- Open XCode. From the File > Open... menu, open the XCode project that
you created. It will be a file called
Unity-iPhone.xcodeprojinside the directory you just saved under in the last section. - Select the Unity-iPhone project by clicking on it.
- In the project menu bar, click on Build Phases to open that section.
- Expand the Link Binary With Libraries list.
- At the very bottom of the Link Binary With Libraries list, click the + sign. This opens a window that says "Choose frameworks and libraries to add:".
- Type
Securityinto the search box. WhenSecurity.frameworkappears, double-click on it to add it to the libraries. - Disable Bitcode by setting Build Settings > Build Options > Enable BitCode to No.
- Now run the project, either by clicking the play button, or by going to Product > Run.
Hope that helped someone!
Ash